

How To Create Test Cases In Selenium
In our previous blog posts on the TestNG framework, we'd covered the installation of TestNG in Eclipse and discussed the various TestNG annotations available for the Selenium Webdriver. If you are planning to learn Selenium Webdriver using TestNG, then it would be worth reading these posts. In case you already know TestNG then you would be aware that it works in a proper sequence with entities like the test cases, test suites, and test groups, etc. In today's post, we'll show how to create a TestNG test case using Selenium Webdriver.
A TestNG test case is an executable item which you can prioritize or run in groups. So Let's proceed to understand the necessary steps required to write a TestNG test case.
In this Selenium Webdriver tutorial, we'll create a demo TestNG project in Eclipse and add the Selenium Webdriver standalone jar to demonstrate the TestNG test case execution. You must note that every TestNG project can have an associated <TestNG.XML> file which outlines the structure of the test cases. It allows you to group multiple test cases into a single test suite. For your reference, a simple version of the <TestNG.XML> is as follows.
<?xml version="1.0" encoding="UTF-8"?> <suite name="Demo suite 1" verbose="1" > <test name="Demo test 1" > <classes> <class name="com.techbeamers.TestA"/> <class name="com.techbeamers.TestB"/> <class name="com.techbeamers.TestC"/> </classes> </test> </suite>
We mentioned about the <TestNG.XML> just because you might need to modify this file to enable/disable test cases. Also, it is one of the typical questions asked during test automation interviews.
Next important thing you might be wondering if the scenario we are going to automate while writing the TestNG case. So here are the details of the use case we'll cover in this demo project.
- Create a TestNG test case class and instantiate the FireFox Webdriver Object.
- Start the Firefox web browser and navigate to the URL (http://newtours.demoaut.com/).
- Fill the user name field with "test".
- Fill the password field with "test".
- Click on the sign-in link for login.
Note: We've tested the code using Firefox version 45.0.1.
Create TestNG Test Case Using Selenium Webdriver
Let's follow each of the steps one by one. We assume that you have a working installation of the Eclipse IDE and the TestNG plugin. If any of these is missing, then you might consider reading theseSelenium TestNG tutorials.
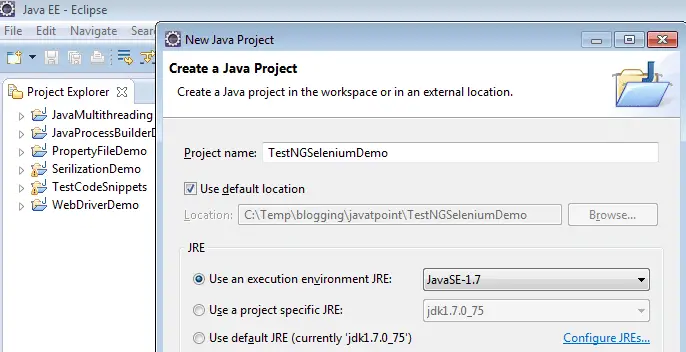
1- Create a new Java project in Eclipse to write your TestNG test case
You need to start the Eclipse IDE and choose to create a new Java project to write the first TestNG test case. Press next and take clues from the attached screenshot.
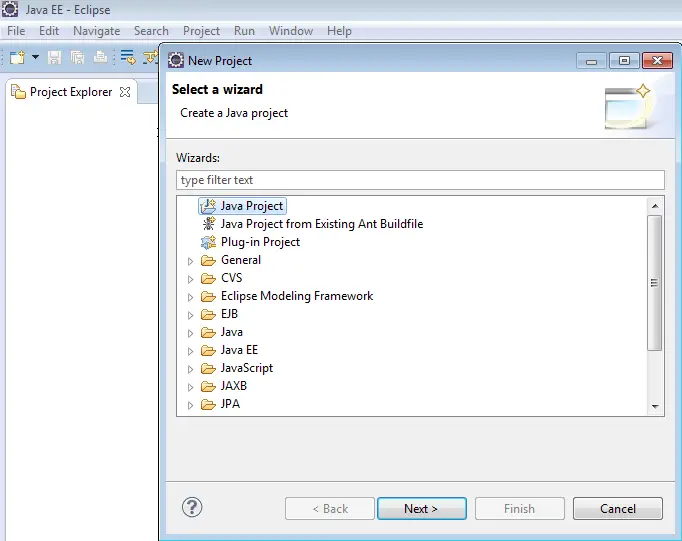
Name the new TestNG project as the <TestNGSeleniumDemo> and press the Finish button for successful project creation.
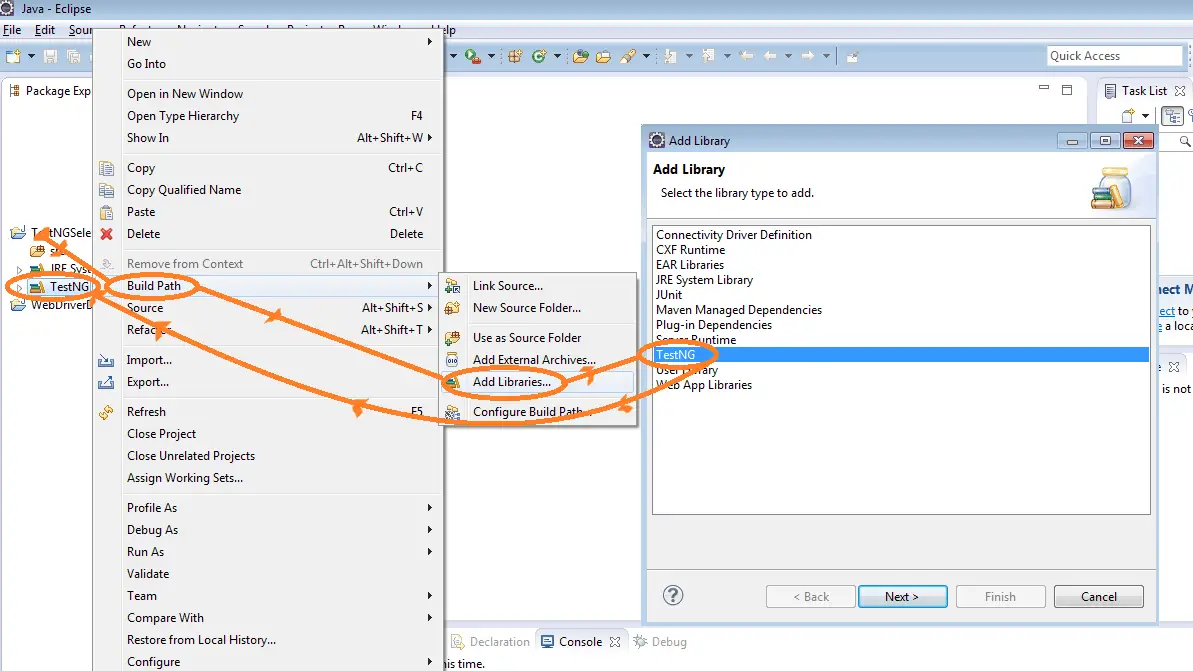
2- Add the <TestNG> library to your Java project
Here are the steps to introduce the <TestNG> library.
Right-click on the project icon to open the context menu and click the "Build Path >> Add Library" option.
It'll open up a dialog listing all the installed libraries. Choose the <TestNG> option to add it to your project.
3- Create a new package in your project
Right-click on the project icon and select the "New" option to create a package as <com.techbeamers.testng>.
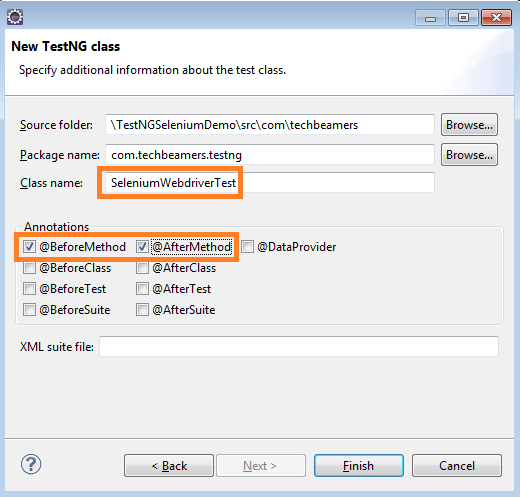
4- Adding a TestNG class
Right-click on the newly created package and select New >> Other.
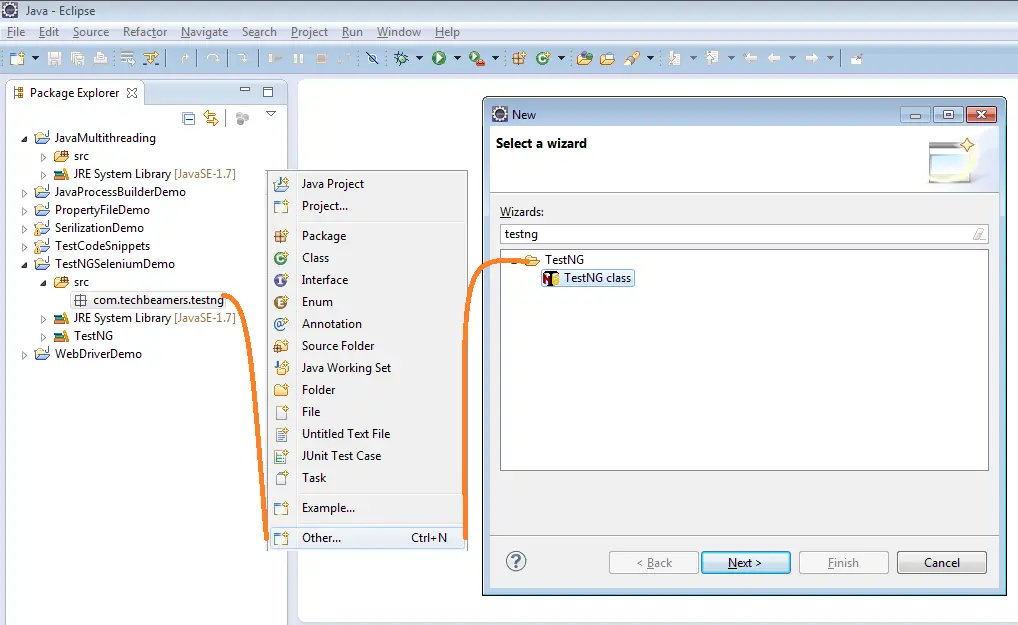
You'll now see a TestNG class dialog like the one shown below.
- Here you must give a name to the new TestNG class as <SeleniumWebdriverTest>.
- Then, select the <BeforeMethod> and <AfterMethod> checkboxes available on the dialog box.
- Finally, press the Finish button to create the class.
After this, the Eclipse will auto-generate the TestNG class code. But there'll be errors in the code because of missing package imports. We are giving you a solution to this issue. You must remember it as it is one of the crucial steps which as you'll need later as well.
Q: How will you fix the import errors for the missing packages?
It's very easy to resolve such compile time issues.
- Make sure you've added the related library into your projects like the TestNG library or the Selenium Webdriver standalone Jar.
- You don't need to remember the names of the required packages. Just press the CTRL+Shift+O keyboard shortcut. And it will automatically add the required imports to your code.
package com.techbeamers.testng; public class SeleniumWebdriverTest { @Test public void f() { } @BeforeMethod public void beforeMethod() { } @AfterMethod public void afterMethod() { } } package com.techbeamers.testng; import org.testng.annotations.AfterMethod; import org.testng.annotations.BeforeMethod; import org.testng.annotations.Test; public class SeleniumWebdriverTest { @Test public void f() { } @BeforeMethod public void beforeMethod() { } @AfterMethod public void afterMethod() { } } 5- Adding Selenium Webdriver's Standalone Jar to your project
You should be careful while adding the Selenium Webdriver jar file because the file must be compatible with the version of the browser (Firefox) you'll use for testing. For this demo project, we've downloaded the latest version of the jar (2.53.0) file from the Selenium website. And we'd the most recent version of the browser (i.e. Firefox 45) which works well with the downloaded jar file.
Here, you may ask why are we using the standalone API of the Selenium Webdriver?
The reason is straightforward and clearly explained below.
- Using it eliminates the need for adding any other dependent library.
- It directly works with the Firefox browser.
- To run your tests with browsers like Chrome, you need to download/add their respective driver's jar files.
6- Write a TestNG test case script using Selenium Webdriver API
We've given the full source code of the TestNg test case script. You can directly copy it to your project's <SeleniumWebdriverTest.java> file. You can change the name of this file, but then you would also need to make the same modifications in the below source code. Here we are automating the test case scenario mentioned earlier, click the <test case description> link to check it.
package com.techbeamers.testng; import org.openqa.selenium.By; import org.openqa.selenium.WebDriver; import org.openqa.selenium.WebElement; import org.openqa.selenium.firefox.FirefoxDriver; import org.testng.annotations.AfterMethod; import org.testng.annotations.BeforeMethod; import org.testng.annotations.Test; public class SeleniumWebdriverTest { WebDriver driver = new FirefoxDriver(); @Test public void MyFirstTestNGTestCase() throws InterruptedException { String title = driver.getTitle(); System.out.print("Current page title is : " + title); WebElement user = driver.findElement(By.name("userName")); user.sendKeys("test"); WebElement pwd = driver.findElement(By.name("password")); pwd.sendKeys("test"); WebElement signin = driver.findElement(By.name("login")); signin.click(); Thread.sleep(1000); System.out.print("\n'SUCCESSFUL EXECUTION!!!"); } @BeforeMethod public void startFireFox() { driver.manage().window().maximize(); driver.get("http://newtours.demoaut.com/"); } @AfterMethod public void cleaupProc() { System.out.print("\nBrowser close"); driver.quit(); } } 7- Run the TestNG Test Case and View Test Execution Report
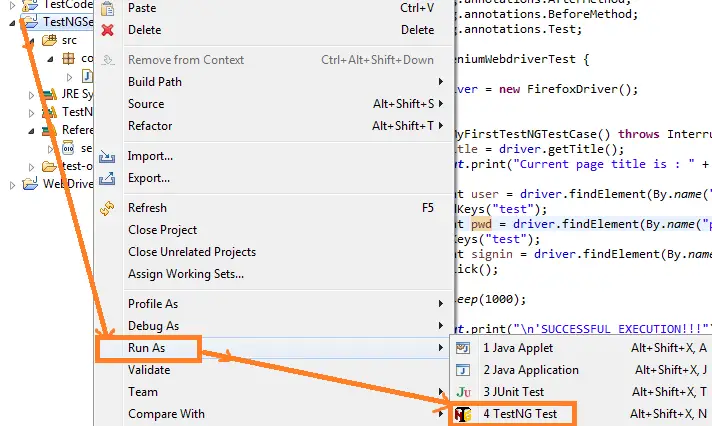
You can easily run any of the TestNG test cases. Just right-click on the TestNG project icon, click the "Run as >> TestNG Test" option to execute the script. Check out the below snapshot for more info.
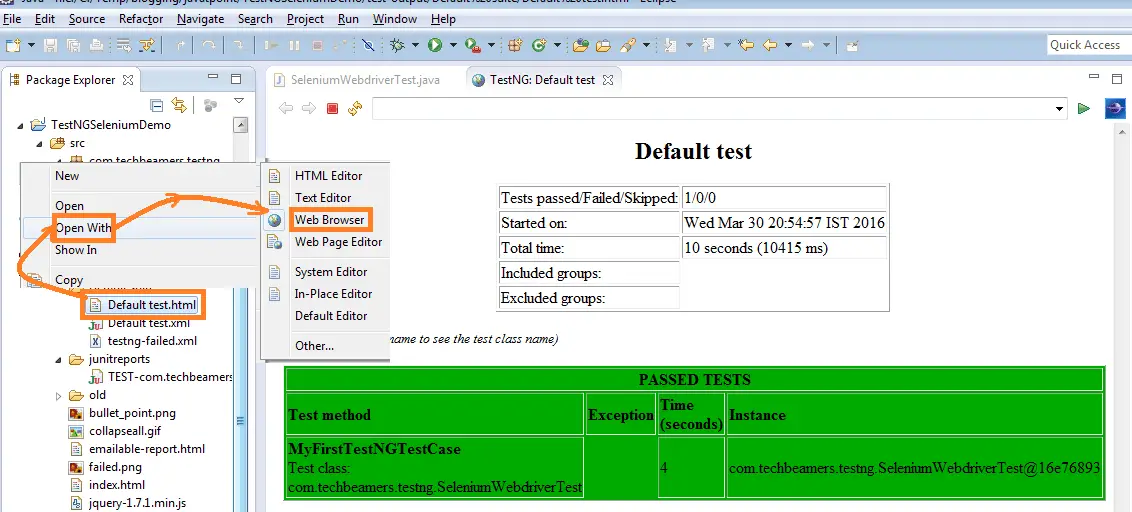
When you run the test case, it creates a <test-output> folder which contains a folder named as the <Default suite>. Here the TestNG project report is available in the <Default test.html> file. You can load the report in Eclipse by opening it in the web browser mode. For more clarity on viewing the test execution report, refer the attached picture.
Final Word – Create TestNG Test Case in Selenium
We tried to reduce the complexity of the steps required to create a TestNG test case using Selenium Webdriver API. Additionally, we mentioned little tricks that can help you write effective test cases and resolve errors.
You can surely build on the concept share in this post and use it to create much larger Selenium Webdriver projects. If you like the content, then please share it further.
All the Best,
TechBeamers
How To Create Test Cases In Selenium
Source: https://www.techbeamers.com/create-testng-test-case-using-selenium/
Posted by: woodardaffeekly.blogspot.com
0 Response to "How To Create Test Cases In Selenium"
Post a Comment