

How To Create A Slope For Drainage
Draining issues can be a home owners worst nightmare. Yard grading is definitely something you can take on as a DIY project. With a little sweat equity and these helpful tips, you'll have this yard grading project knocked out in a weekend.
If you have concerned about the slope of your yard this is the post for you. Learn yard grading techniques now to prevent major water problems later.
Why would you need to grade your yard?
The reason for grading your yard is to move the water/runoff from where it's currently traveling to a different location. In most cases, home owners regrade the yard in order to get the lawn to slope AWAY from the house so that it doesn't pool next to the foundation and potentially cause flooding and water problems in the future.
Yard grading is helpful if you have standing water pooling in different areas of your yard. Not only is stagnant water ugly and annoying, it attracts those PITA mosquitoes and other bugs, kills your grass and plants and can even weaken your home's foundation.
In addition, improper water drainage is often a symptom of much larger problems. So, regrading your yard slope can remedy these larger problems (or potential problems, depending on when you're reading this).
First, if you already have water leaking into your basement, you should consider grading your yard (as soon as possible… if it's possible). Proper grading can move the water away from your home so that you don't get flooding and all sorts of other foundation issues.
In my case, when my home was inspected, there was some concern about the slope of the yard slanting TOWARD the house. While I didn't notice any water/flooding issues (yet), this is definitely something that I wanted to fix ASAP. It's best to correct this problem before there is a big issue.
Planning & potential problems
This yard grading project, just like every other project, took a bit of planning. The actual grading of the yard wasn't difficult at all– except for the mix of 90 degree heat and manual labor. Despite its simplicity, here are some potential items you should address before starting the project.
Adjusting/relocating pipes, traps, vents, etc.
The pipes that lead to my oil furnace were only coming out of the ground by a little bit. So, when I had my furnace cleaned back a few months ago, I asked Mr. Wally the Furnace Guy to raise these pipes. All it took was a couple fittings to extend the height of the pipes so we wouldn't bury them, and I could still get my oil.
You can also buy some fittings at the hardware store to extend the pipes yourself. I would be cautious if you don't know what the pipes and vents do… consult a professional.
Also make sure you won't be covering any traps, vents or anything else when you fill in with dirt. You don't want to bury anything important.
I also had a random hole in the foundation… I'm not sure what it was for but it's definitely not in use anymore. So, before we graded the yard, we filled the hole up with cement to close it off. Problem solved.
What to do about basement windows
Without planning, we would have buried the basement window! Not good! But luckily this is an easy fix.
All we did was buy a window well, and wrap this around the window in a half-moon shape. Then, we filled the dirt around the outside of the window well. The well acts as a retaining wall to hold the dirt away from the window, even though it's now at ground level.
And, because it's shaped like a half moon, there's still some room to let the sunlight in!
Is there enough space to regrade my lawn?
I get this question a lot. And, I'll address it a little later when I talk about slope. But, the short story is that if you need to grade your yard slope AWAY from your house, but you can't raise the soil high enough to be above the highest point of your yard that you need to slope towards, you can't move forward with regrading. The math/numbers need to work!
Also, you should leave about 6″ minimum (in some places it's 8″) of your foundation showing in order to ensure that you don't damage the home's structure.
Check with your local building officials to be sure. This regulation is part of the International Residential Code that most cities in the U.S. adopt. You can look it up here (should be in IRC, Chapter 3)
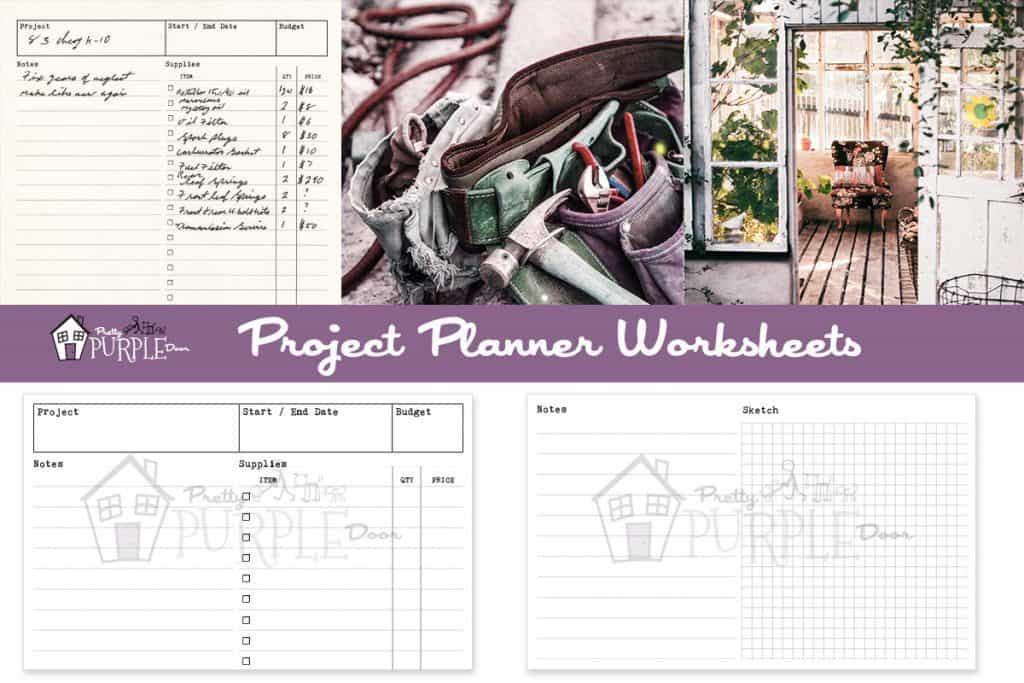
Project Planner Worksheets
If you plan a lot of DIY projects around the house, you may be interested in my project planning worksheets. Print new ones whenever you need – they will keep you super organized as you're working and also serve as a great way to archive your projects when they're done!
Alternative solution: French Drains
If you can't see a way to regrade the slope of your yard based on this information, you're probably wondering how on earth you can fix this problem. My suggestion is to install a french drain in order to fix the water issues.
A french drain is basically a pipe with holes in the top that you bury underground so that when the water seeps down it will drain into the pipe and be redirected away from your house. The drain pipe will have a slope to it in order to redirect the water to a different area (i.e. away from your home).
So, if you think this could be the solution for you, check out my article, How to install a french drain in your yard, which gives step-by-step instructions that you can follow to install a french drain.
How to Grade a Yard (Step by Step Process)
Yard grading sounds scary and complicated… but it's really not. The first step is to take a walk around your house and see which way the yard is sloped. Since you're reading this you probably already know where your problem areas are :).
Here's what to do:
Find your high and low points.
Using a can of spray paint to mark the high and low points can be a helpful visual indicator.
- High Point: This is where the water starts draining in the WRONG direction. In my case, about 2-3 feet away from the sidewalk is where the slope of the yard started to dip down. This caused the water to flow toward the house.
- Low Point: This is where the water ends up (the yucky wet spot in your yard causing drainage issues or leaks is a good indicator). In my case, the water was pooling next to the foundation… so that's my low spot.
Establish a level grade line
After you find the high and low points, you'll need to determine the "Rise" and the "Run" of your land. This will allow you to establish a level grade line so you'll know how much grading you need to do. Don't trust your eye… it can be very deceiving!
What you'll need:
- Ground stakes
- Nylon rope
- Line levels— or try this Multipurpose Laser Level Measure Line.
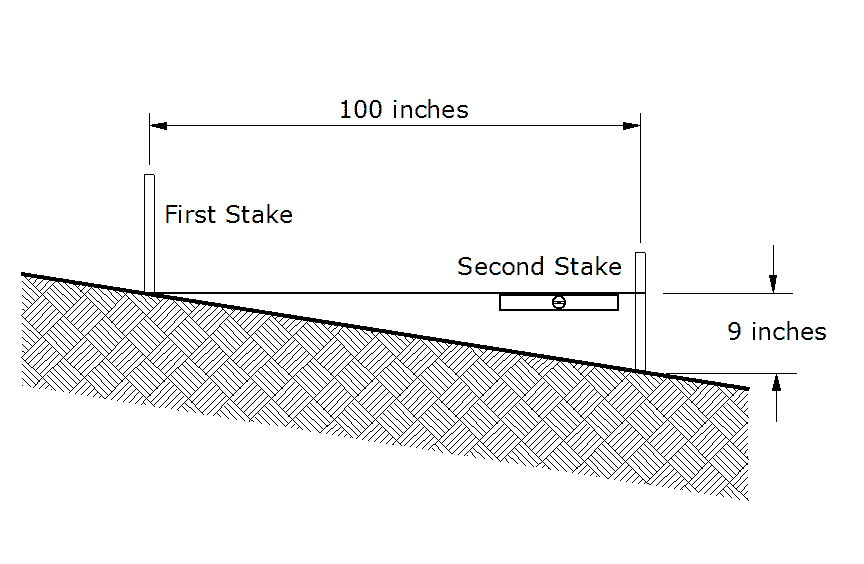
The "Run" is the horizontal distance. Or, how far your highest point is from your lowest point. Your run needs to be a level, straight line. To measure the horizontal distance, put a stake in the ground at the highest point and another stake at the lowest point. Connect the two stakes with a tight string with a level attached to it so that the string is perfectly level. Measure the length of the string. This is your "run."
The "Rise" is the vertical distance.The number of inches/feet that the ground is sloping from the highest point to the lowest point that you've marked. It's much easier to find the rise once you have the run (above). To get your rise, all you have to do is measure the stake that is at your low point all the way from the string straight down to the ground.
Finding the level grade line can be confusing, so watch this video by This Old House to get more clarification if you are having trouble.
By the way, if you are a gadget guy or gal, check out this awesome Laser Distance Meter by Taklife. I bought one not too long ago and it's amazing. It measures nearly 200 foot distances and can give you not only the length but volume, area and all sorts of other super cool things. Definitely check it out.
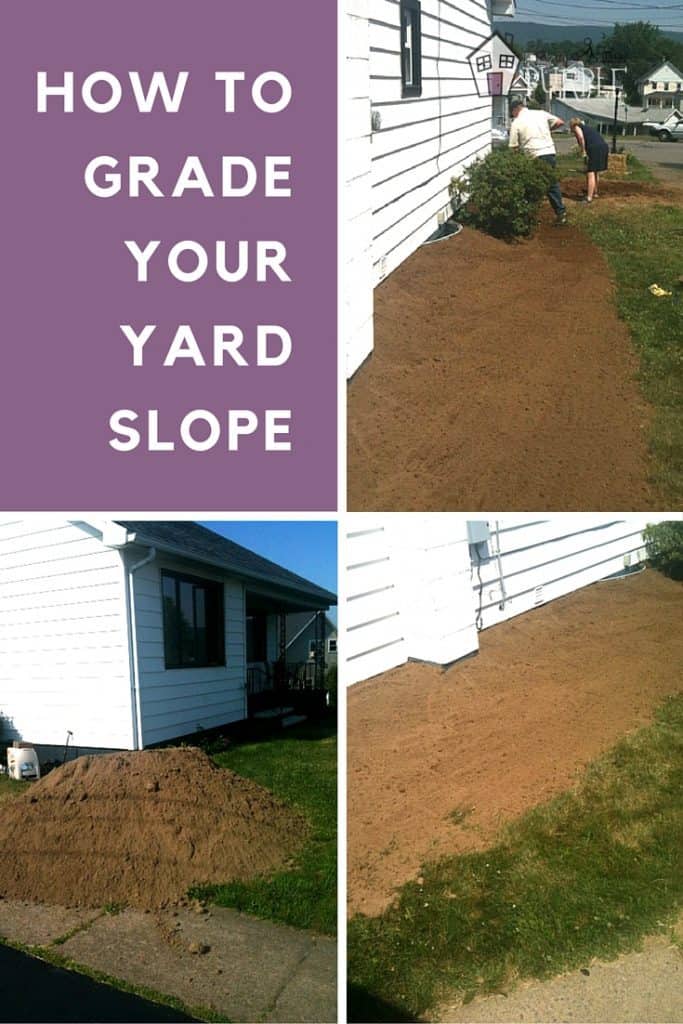
Order a truckload of topsoil (DIRT).
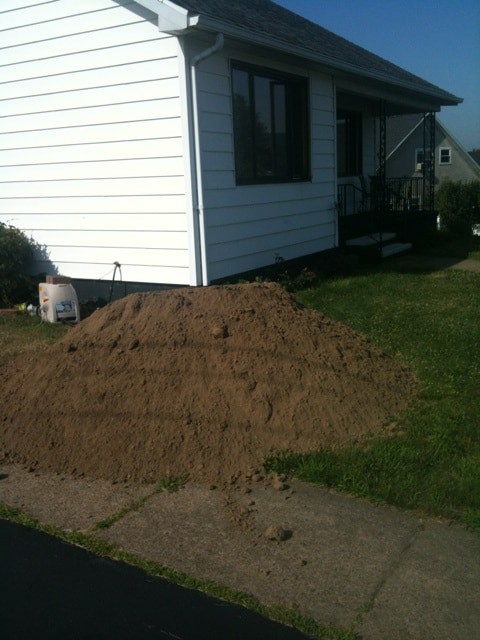
You can even have it delivered, which is what I did. If you don't need that much dirt for your project, just pick up a few bags of topsoil from the hardware store. Topsoil usually comes in 40 lb. bags and cost less than $2.00 each.
Dump the pile of dirt at your low point.
Shovel the dirt into a wheelbarrow, and dump the pile of dirt at your low point. So, if the water is draining toward your house, you'll want to dump a big old pile of dirt against your foundation so you can reverse the grade.
You'll need to dump enough dirt so that this problem spot (low point) becomes your high point. Remember that measurement we just took? It should come in handy now! The pile of dirt needs to be taller than that number on your tape measure.
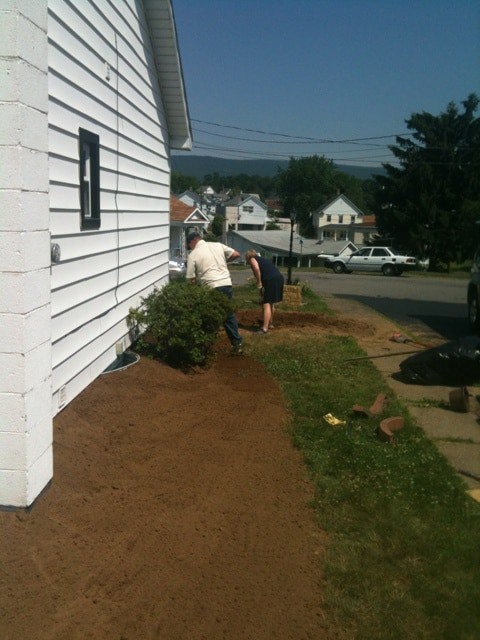
Use the back of a rake to smooth the dirt.
Pank down the dirt.
As as you work on regrading the yard, you can use a sheet of plywood laid onto the dirt to pank everything in. Just jump and stomp on the plywood (or whatever you have handy), to make sure you are filling everything and it wont settle too much. Don't want to be ghetto like me? Use a tamper like this one. You will look much cooler.
Using the back of a hard rake, carefully and slowly pull the dirt from your new high point (aka problem area) to your new low point (what used to be the high spot). The goal here is to change the angle of the slope.
What Blooms with What?

Never know what to plant together? Find out with this FREE Plant Pairing Guide and become a pro at combining plants for the best garden design possible!
Success! Now check your email to confirm your subscription.
Once you are panked and tamped and out of breath, you can get a drink of water, because you are done grading your yard.
Well, almost. It's kind of ugly now isn't it? Maybe we should plant some grass so noone will ever know about our yard grading project!
Plant New Grass
Once you are happy with the new slope of the yard, the next step is to plant new grass seed.
- Toss some handfuls all over the freshly graded dirt
- Slowly churn and spread the seeds lightly with the rake. This will kind of set them into the dirt, and hide it from the birdies :). Some of your seeds will still be on the surface and that's ok!
- Soak the dirt with the hose to give the seeds a nice drink.
- Then cover the seeds with some hay or yard clippings — this covers the rest of the seedlings. Hides them from the birds and helps the grass seeds to retain the moisture from your watering.
- Soak the whole area again. Grass seeds need a lot of water.
- Watering every day will produce little stubs popping through in about a week!
What every home owner needs on hand in case of a water problem
So we've talked a lot about how to grade your yard for proper drainage. And, if it's not possible to grade your yard you can use a french drain. But… what do you do if you are getting water into your basement? This recently happened to me after we got 7 inches of rain in one day! Yes… 7 inches.
There was a tiny pinhole in my foundation in the basement, through which water was literally POURING out of like a faucet. I panicked. Water can cause so much damage so quickly. I was able to stop the flow temporarily with one of those stretchy erasers and some flex seal… but I was lucky that this worked for a few hours until I could get the good stuff: Fastplug. FastPlug is a product by Drylock that comes in a powder form. You mix it with some water and it will plug a hole… even with the pressure of water pouring in fast. It's an absolute lifesaver if you are having water issues…. and I suggest that you keep some on hand at all times just as a precaution.
Of course, FastPlug is really just a bandaid for the real problem of improper water drainage. Upon investigation, I noticed that on the opposite side of my house, there's a bit of a dip in the slope causing the water to head towards my foundation. So, off to the hardware store to get some topsoil and redirect the water here too. It's not a very serious slope, but it was enough to cause some damage during this really bad storm. So, just make sure you pick up some FastPlug while you're out gettting these yard grading supplies. You'll thank me later!
Don't forget to grab my super handy project planner worksheets for all of your DIY project needs! Check out the video to see how I use them.
Wrapping Up
Changing the slope of your yard may seem like a daunting task, but it really isn't! To grade your yard, just find your high spot and low spot, and reverse them. Use the back of a rake to make a nice, slow, even grade in the RIGHT direction. Not only is this a cheap and easy DIY project, but it's a proactive one, and that's what I love. Being a proactive home owner is the ONLY way to be. Stopping drainage problems before they start will stop leaks before they start. This stops water damage before it starts. This stops you from having to open your wallet. Saves you huge headaches in the future.
The best part? This yard grading project only took me 3 hours. So, no excuses! Get to it this weekend! Don't forget to check out my article about installing a french drain in your yard… because this is definitely a great alternative solution for fixing water drainage problems on your property.
More landscaping posts you'll love
-
5 Tips for Drawing a Killer Garden Plan, Even if You're Not a Designer
These 5 steps will take you through the process of drawing a simple garden plan for your home landscape. Learn my simple process for drawing your own garden plan that's uniquely you.
-
This Blocking Method Will Have You Drawing Pro Garden Plans in No Time
If you're struggling to arrange plants, try the blocking method. This is a way to draw your garden plans using a series of shapes and repeating patterns. It's really fun, too!
-
5 Things I Wish I Knew About Garden Design (These Would Have Saved Me $$$ Thousands)
Ever wonder what no one is telling you about designing your dream landscape? These garden design tips would have saved me so much time, money and sanity. And, I'm spilling all the secrets!
What Blooms with What?
Never know what to plant together? Find out with this FREE Plant Pairing Guide and become a pro at combining plants for the best garden design possible!
Success! Now check your email to confirm your subscription.
How To Create A Slope For Drainage
Source: https://www.prettypurpledoor.com/yard-grading-how-to-grade-a-yard/
Posted by: woodardaffeekly.blogspot.com
0 Response to "How To Create A Slope For Drainage"
Post a Comment